‏إظهار الرسائل ذات التسميات halloween. إظهار كافة الرسائل

الخميس، 11 أكتوبر 2012

Needlepoint Witch Hat Pattern and Tutorial By June Crawford of A Creative Dream

I just LOVE needlepoint and LOVE Halloween so I was thrilled to see that June Crawford had a wonderful tutorial on her A Creative Dream  blog showing you how to make a needlepoint witches hat. I just LOVE it and definitely have it on my "to do" list.  Is it on yours, too?


Copyright © 2009 - All Rights Reserved - Written by June Crawford of A Creative Dream

Here's what June had to say about her tutorial:  Long, long ago in a far away land.... I designed needlepoint. Was actually pretty good at it too...but it's difficult to keep a business up and running when you are the one who does it all, so I stopped designing needlepoint, and went to work in an office...

While rummaging through several CDs, looking for something completely different, I ran across one of the online projects I had offered. It is darned cute I have to admit....and since it's Halloween, I thought..."hey, why not put it up on the blog?", so, here it is!

Please respect June's TERMS OF USE:  Please note, in regard to the copyright, all of the directions and photographs in my tutorials are mine, you may not copy or reproduce them without my consent. These instructions are for you to use for PERSONAL use only, not for profit.

For this particular tutorial - Here is the only caveat...I own the copyright to the design. You may not publish it on your site without asking first. It cannot be used to teach a class, or used as a hand out for your business, nor can it be used or offered for resale.

June's Bio:  Me... a dreamer, a ponderer of big and small thoughts. A wanna-be artist, a soon to be empty-nester... wondering what the heck I am gonna do with the rest of my life...

Copyright © 2009 - All Rights Reserved - June Crawford of A Creative Dream.

Please visit  her A Creative Dream blog at http://acreativedreamer.blogspot.com/. Her A Creative Dream Flickr page is at  http://www.flickr.com/photos/creativedreamer/ .


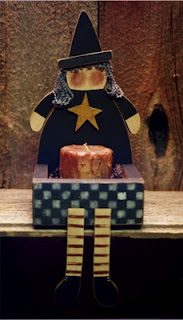
Wanda Witch Box E-Pattern By Sue Allemand of Palette Primitives

Are you looking for a cute and adorable witch project to make for Halloween.  If you are Sue Allemand has a terrific e-pattern on her Free Paintin' Patterns blog for making a witch box with dangling feet.

Please Note: Unfortunately Sue's free e-pattern is no longer available.


Copyright © 2010 - All Rights Reserved - Sue Allemand of Palette Primitives.

Here's what Sue had to say about her pattern:  What a cute and easy Witch Box with her dangling legs!  FREE PATTERN!  Load the box with candies, potpourri, or just use your favorite candle as shown!  EASY to cut from pine wood and EASY to paint & assemble!  Complete instructions include "faux finish antiquing", stenciling, and staining!

Please respect Sue's TERMS OF USE: All designs are copyright protected by Sue Allemand. You are given the right to make the finished products for personal use or profit (selling on the internet is fine), however, no mass producing, copying, sharing or distributing of the pattern or design is allowed. Please give credit to the me whenever possible. Thank you!

Copyright © 1999-2012- All Rights Reserved - Sue Allemand of Palette Primitives. Sue is a professional artist and designer.

Please visit Sue's Palette Primitives website at http://paletteprimitives.com, her Palette Primitives "Get Your Prim On" blog at http://www.paletteprimitives.blogspot.com, her Free Paintin' Patterns blog at http://freepaintinpatterns.blogspot.com and her Free Stitchin' Patterns blog at http://freestitchinpatterns.blogspot.com.

الخميس، 13 سبتمبر 2012

Ode To Halloween Wall Quilt Free E-Pattern By Kaaren Johnston of The Painted Quilt

If you are looking to make an adorable Halloween wall hanging then you'll be happy to know that Kaaren Johnston had a wonderful e-pattern on her The Painted Quilt blog showing you how to make an adorable "Ode To Halloween" wall quilt.  This is definitely going on my extensive "to do" list.

First Friday Freebie #14 - Ode To Halloween

Copyright © 2010 - All Rights Reserved - Kaaren Johnston of The Painted Quilt

Here's what Kaaren had to say about her pattern:  If you guessed that this month’s First Friday Freebie would have a Halloween theme, you would be right! What better month than October to have a Halloween project to work on? October’s FFF is called “Ode to Halloween”.

Please respect Kaaren's TERMS OF USE:  The use of my pattern/design and tutorials is limited to individual and personal use only. Distributing or selling my pattern or tutorials in any form is not permitted. They may not be used for commercial purposes unless written permission is granted. Credit for my pattern and tutorials should be included if displayed in any manner. Individual users may enlarge or reduce the size of the drawings for their personal use but may not alter them in any other way.

Kaaren's Bio: I am an artist and have recently retired from actively designing, publishing and travel teaching in the decorative painting industry. A short while later, in December of 2010, we moved from Eastern Ontario to the beautiful Annapolis Valley of Nova Scotia. Quilting, stitching, applique and most recently rug hooking have become my new passions. Oh, and did I mention that I love to make and collect pincushions and needlecases! Join me on the First Friday of every month when I release a new Freebie design for you to make and enjoy.


Copyright © 2009 - 2012 - All Rights Reserved - Kaaren Johnston of The Painted Quilt.

Please visit her The Painted Quilt blog at  http://thepaintedquilt.blogspot.com/ and her The Painted Quilt Etsy shop at http://www.etsy.com/shop/kaarenjohnston.


الاثنين، 3 سبتمبر 2012

Halloween Hauntings Mini-Quilt Free Pattern By Kaaren Johnston of The Painted Quilt

Halloween is the perfect time for decorating - especially with mini quilts.   If you're looking for a spooky mini-quilt for your Halloween decorating then you'll be pleased to see that Kaaren Johnston had a wonderful pattern on her The Painted Quilt blog showing you how to make a "Halloween Hauntings" mini quilt.

First Friday Freebie #2 - Halloween Hauntings

Copyright © 2009 - All Rights Reserved - Kaaren Johnston of The Painted Quilt

Here's what Kaaren had to say about her pattern:  Today is the First Friday of October, so that means my second Freebie design…’Halloween Hauntings’… is available for your enjoyment, right here and right now!

Please indulge me a bit while I tell you how this project evolved.

Since Halloween occurs on the 31st of October and because I love to decorate for the seasons, I thought that a Halloween themed design would be appropriate for my second FFF (First Friday Freebie).

Initially, my original design started off as a Halloween, sampler-style stitchery and it was my intention to stop at that.


Please respect Kaaren's TERMS OF USE:  The use of my pattern/design and tutorials is limited to individual and personal use only. Distributing or selling my pattern or tutorials in any form is not permitted. They may not be used for commercial purposes unless written permission is granted. Credit for my pattern and tutorials should be included if displayed in any manner. Individual users may enlarge or reduce the size of the drawings for their personal use but may not alter them in any other way.

Kaaren's Bio: I am an artist and have recently retired from actively designing, publishing and travel teaching in the decorative painting industry. A short while later, in December of 2010, we moved from Eastern Ontario to the beautiful Annapolis Valley of Nova Scotia. Quilting, stitching, applique and most recently rug hooking have become my new passions. Oh, and did I mention that I love to make and collect pincushions and needlecases! Join me on the First Friday of every month when I release a new Freebie design for you to make and enjoy.


Copyright © 2009 - 2012 - All Rights Reserved - Kaaren Johnston of The Painted Quilt.

Please visit her The Painted Quilt blog at  http://thepaintedquilt.blogspot.com/ and her The Painted Quilt Etsy shop at http://www.etsy.com/shop/kaarenjohnston.

الأربعاء، 4 يوليو 2012

Little Monsters Free Tutorial by Alisa Burke

Decorating for Halloween is so much fun.  Especially when Alisa Burke shows you how to decorate with adorable little monsters.  Have fun decorating!

little monsters tutorial
Copyright © 2010 - All Rights Reserved - Written by Alisa Burke of Alisa Burke

Here's what Alisa had to say about her tutorial: With Halloween right around the corner, I was inspired to create a handful of colorful little monsters from recycled cardboard tubes. If you weren't aware, I love finding new ways to upcycle cardboard tubes- they are free and super easy to turn into something unique. This project would be really fun for kids or for those who are like me and sometimes act like a kid!

Please respect Alisa's TERMS OF USE:  I work really hard to come up with my art, tutorials, ideas, classes, inspiration and more. Please understand that everything I post on my blog is for your personal use only - not for resale or redistribution. Please contact me if you are interested in using anything that I share online-thank you!!!

For more information on Alisa's Terms of Use please CLICK HERE.

Alisa's Bio: Alisa Burke is a freelance painter and mixed media artist who studied fine art at Portland State University. With a background in painting and printmaking, a desire to explore and push materials, Alisa is always looking for new ways to break the rules and redefine art. She draws inspiration from street art, graffiti, art history and fashion and it is not uncommon to find her digging through the trash in hopes of recycling something unique use in her artwork.

Alisa’s paintings have been exhibited in a variety of galleries and her handmade, painted accessories are carried in a number of boutiques across the country. Her artwork has been featured in publications such as Cloth Paper Scissors, Quilting Arts, Where Women Create, Somerset Studios’ Haute Handbags, Art Doll Quarterly, and the University of San Diego Magazine. In addition to making art, Alisa teaches a variety of workshops nation wide. Alisa appeared as a guest artist on the DIY Network show Craft Lab and book Canvas Remix was released in spring 2008.

Copyright © 2010 - All Rights Reserved - Alisa Burke of Alisa Burke.

Please visit her Alisa Burke website at http://www.alisaburke.com and her Alisa Burke - Redefine Creativity blog at http://www.alisaburke.blogspot.com. Her Alisa Burke Etsy shop is at http://alisaburke.etsy.com.

الخميس، 28 يونيو 2012

Cheap Trash Bag Halloween Decorating Free Tutorial by Jessica Jones

Are you looking for a cheap and easy way to decorate for your Halloween party this year? If so you'll want to check out Jessica Jones cheap trash bag Halloween decorating idea.

Copyright © 2011- All Rights Reserved - Written By  Jessica Jones of Jessica Jones.

Here's what Jessica had to say about her tutorial:  In a burst of festivity, I decided we should have some Halloween decorations in the house. Something 1) dramatic, 2) super cheap, and 3) didn't require me to go to the store. Behold: trash bag spiderwebs.

Please respect Jessica's TERMS OF USE:  You're welcome to link to my How About Orange blog or use a single image and brief description to link back to any post. Republishing posts in their entirety is prohibited without permission.

Copyright © 2011 - All Rights Reserved - Jessica Jones of Jessica Jones. Jessica is a professional graphic and textile designer.

Please visit her Jessica Jones website @ http://www.jessicajonesdesign.com/ and her How About Orange blog @ http://howaboutorange.blogspot.com/.

الاثنين، 9 أبريل 2012

Free Pattern for Count Truffula, Vampire Piggy! From Lisa Bunting Thoms of Q.D. Patooties

I just LOVE softies - especially the ones that Lisa Bunting Thoms designs for  Q.D. Patooties and she has a wonderful Dracula pattern to share.  Here's Count Truffula!

Count Truffula, Vampire Piggy!
Copyright © 2010 - All Rights Reserved - Lisa Bunting Thoms of  Q.D. Patooties

Here's the instructions and what Lisa had to say about her pattern:  Sorry it took me so long to upload this but when I went to open my software last night that I usually use to clean up my patterns, it said the link wouldn't work so I guess I will have to find my discs and re-install it. In the meantime, I am hoping you all can read my chicken scratch handwriting on the pattern pieces to make out what goes where!

Click on picture to enlarge.
Materials:

1/4 yard Felt or Other Material for Pig Body 
Scrap Felt for Ear Lining, Mouth Lining, Eyes and Teeth
1/8 Yard Felt for Cape
Embroidery Floss
Yarn or Ribbon for Cape
Sewing Machine (a little too much to do by hand)
Poly Fil
Embroidery Floss
Needle 
Thread
Craft Glue
Pipe Cleaner

Instructions:

1.) Copy and save pattern to your hard drive by double clicking on the pattern image. Right click on the pattern and then choose "Save Image As" and name the file.

2.) Print your pattern and cut out all pattern pieces. Trace pattern pieces according to the number required for each pattern piece onto your fabric.

3). Starting with the ears, line up the bottoms of both the inner and outer ear pieces and then topstitch the inner ear piece to the outer ear piece. You may tack them in place by pinning, basting or using some craft glue if you feel uncomfortable just sewing them without them being securely in place. Repeat for the second ear and then set aside.

4). Next, line up the notch on the fangs pattern piece with the notch on the mouth pattern piece. Topstitch the fangs to the mouth piece (as with the pieces above you can secure them the same way if you like before you topstitch) and then position it underneath the cut open mouth on the front pattern piece of your piggy vampire. Pin in place and then sew by machine or by hand if you choose.

5). Find the nose pattern piece and position it about an inch above the open mouth on the front piece of the pig pattern. Make sure it is centered and then stitch in place by hand or machine.

6). Position each eye between the mouth and nose and about an inch and a half from the side on the front piece of the pig pattern. Secure them prior to sewing with by basting or with a little craft glue just to make sure they are even before you sew them into place permanently. Sew them in place by machine or by hand.

7). Set the front piece of the pig pattern aside and sew all of your arms and legs making sure to leave them open at the top for a little stuffing. I did not turn mine but just clipped them close to the seam, filled with a little Polyfil and then pinned them to the right side of the front piece of your pig pattern making sure the open pieces of each part were pinned to the edge of the pig pattern and all of the closed ends of the arms and legs pointed in towards the mouth. Pin on the ears the same way. Set this aside while you complete the back of your pig.

8). Sew the back piece of your pig pattern from Point A to Point B and then from Point C to Point D leaving an opening to stuff your pig. Set this aside and work on your pig's tail.

9). Sew your pig's tail together. I didn't turn this either just clipped close to the edges and then inserted a small piece of pipe cleaner (bent in half) to make it curly. Set your pig's tail aside.

10). Pin the right sides of both the front and back pieces of your Pig Pattern together and then sew around the outside. Now you can turn your pig and clip as close to the seam as you can. Stuff your pig with Polyfil and you are ready to sew up his back seam. He's transforming before your very eyes!

11). Grab your pig tail pattern piece and pin at the very bottom of the open seam on your pig's back. Ladder stitch it in place as you are sewing up the back of your pig. Your getting close now -- he's almost done!

12). Lay a small piece of felt down underneath your completed pig. Cut out a rectangle the length of your pig and 1 1/2 times the width of your pig. Using a large eyed needle, thread it with yarn or ribbon and do a running stitch about 3 inches down from the top. Leave a long tail on each end so you can secure it around your vampire piggy's neck.

13). Count Truffula is now complete and is ready to start sucking the life out of all of your chocolates! I would hide them now if I were you.

Now that you've completed your Count Truffula, Vampire Piggy, snap a photo and send it to me or just drop it in the q.D.paToOtieS Flickr Group. I'll show off your creation and send a link back to you at your Blog or on Flickr. 

As with any of my patterns, this is not intended for commercial use but just for the fun of making for yourself or your friends.

Enjoy!


Please respect Lisa's TERMS OF USE:  My FREE tutorials, patterns, and how-to's are for personal use only and are not not intended for commercial use. They may not be copied, reprinted, emailed, or reproduced and distributed in any manner without my permission.

Lisa's Bio: Lisa is a professional teddy bear artist selling heirloom quality collectible bears to Adults and has been making bears professionally since November 1997. Her creations have been nominated for several Awards including the TITA, Teddy Bear Scene Reader's Choice Awards and the Ace Awards. They've also been included on a regular basis in many of the major doll and crafts magazines.

Copyright © 2007-2012 - All Rights Reserved - Lisa Bunting Thoms of Q.D. Patooties at http://qdpatooties.blogspot.com


Please visit Lisa's Q.D. Patooties Spoonflower Fabric Shop and her Q.D. Patooties Etsy Shop.

السبت، 7 أبريل 2012

Half Past Midnight, A Witch's Cat Free Pattern From Lisa Bunting Thoms of Q.D. Patooties

I just love adorable creatures.  If you do, too then you'll be pleased to know that Lisa Bunting Thoms of  Q.D. Patooties  has an adorable cat pattern to share.  I hope you enjoy making "Half Past Midnight, A Witches Cat".


Half Past Midnight, A Witch's Cat Pattern

Copyright © 2008-2009 - All Rights Reserved - Lisa Bunting Thoms of Q.D. Patooties


Click on picture above to enlarge.

Here's the instructions and what Lisa said about Half Past Midnight, A Witch's Cat:  All you need to do is to click on the pattern above and save it to your computer. After you click, the pattern will enlarge. Then, just right click and "Save Image As" to save it to your computer. Then follow the instructions below:

1)  Trace the pattern pieces onto felt or the fabric of your choice. I trace mine onto the felt and then sew around it before cutting it out. If you choose to cut your kitty out and then sew it, please add 1/8" seam allowance to your pattern.

2)  With all your pieces sewn, cut as close to the seam edge as possible. Felt does not fray and this will make it easier to turn. To turn your tail, push a drinking straw down inside your tail and then, using a wooden skewer, push the sewn end of the tail into the straw with the skewer. Like magic, it will start to turn! If you have trouble turning your arms and legs, use the same method to turn them.

3)  Sew on your face and star eye patch with some decorative stitching. To hold the pieces in place, I use a fabric stick glue that can be found at your local sewing store in the quilting section. It keeps everything in place while you work.

4)  Stuff your kitty starting with the arms and legs, then the body and finally fill your head as tightly as you can. Sew up your kitty using a ladder stitch, as shown below.


5)  Embroider your kitty's face, add one winking eye and one regular eye (I used a vintage 9mm shoebutton for my regular eye) and a collar with a bell (I found these cute pumpkin jingle bells in the button section of my local sewing store). Now, here's a little bit about the kitty you just made:

Meet a magical little kitty named Half Past Midnight. The witch who owns him named him that because he's not exactly black - he's navy blue. The same color blue that the sky turns when it's lit by a pale blue moon which isn't that often you know. He's also got the most peculiar marking in the shape of a star over one eye. That's the eye he winks when he he wants to do magic. He also has an extra long tail that he swishes at the same time to increase his magical powers. Mystical, yep. Cute, you betcha.

Enjoy!


Please respect Lisa's TERMS OF USE:  My FREE tutorials, patterns, and how-to's are for personal use only and are not not intended for commercial use. They may not be copied, reprinted, emailed, or reproduced and distributed in any manner without my permission.

Lisa's Bio: Lisa is a professional teddy bear artist selling heirloom quality collectible bears to Adults and has been making bears professionally since November 1997. Her creations have been nominated for several Awards including the TITA, Teddy Bear Scene Reader's Choice Awards and the Ace Awards. They've also been included on a regular basis in many of the major doll and crafts magazines.

Copyright © 2007-2012 - All Rights Reserved - Lisa Bunting Thoms of Q.D. Patooties at http://qdpatooties.blogspot.com.

Please visit Lisa's Q.D. Patooties Spoonflower Fabric Shop and her Q.D. Patooties Etsy Shop.

Monkenottukhamun Free Pattern From Lisa Bunting Thoms of Q.D. Patooties

I thought you might all like to know that Lisa Bunting Thoms of  Q.D. Patooties  has another wonderful pattern to share. I just love Lisa's creations and "Monkenottukhamun" is just too adorable for words!


FREE Pattern for Monkenottukhamun

Copyright © 2008-2009 - All Rights Reserved - Lisa Bunting Thoms of Q.D. Patooties


Click on picture above to enlarge.


Here's the instructions and what Lisa said about Monkenottukhamun:  So here's his official "story." Because if you know anything about me, all of my softies have to have a "story." Meet King Monkenottukhamun, pronounced monkey-not-too-common, (meaning you don't see mummified monkey pharaohs rising from the dead to carry out a curse for disturbing his tomb). This little guy is just in time for Halloween. Maybe he can pick up some treats while carrying out his curse or something. I mean, what could make you happier in the afterlife - a room full of solid gold banana statues or a tub full of chocolate?

And now for the directions. Click on the pattern itself to see it full size. Then, right click on your mouse and "Save As" to your hard drive. Using your image software, print out the pattern onto cardstock or paper if you prefer. Cut it out and then trace it on to your fabric. Now, this is how I make my monkey. I cut out the muzzle in a lighter fabric and set it aside. I cut out the tail, sew it and set it aside. Next, I trace my monkey onto my fabric. I either cut enough fabric so I can fold it and have it doubled or cut a piece of the same size and put it behind the first piece of fabric where I trace my body pattern. Then, I sew around the monkey, following along the lines of the pattern leaving about a 3-inch opening at the top of the head to stuff him. Then, I cut him out as close to the seam as possible and turn him. Using a fabric glue stick, I put glue on the back of my muzzle and position it on the face where I want it so when I go to do my hand stitching around it, I know it is firmly in place and isn't going to slip around on me. After I embroider my facial features, I stuff my monkey and sew up the head. Then I put on my monkey's eyes (either glass eyes or sew on buttons) and sew on his tail. For the final touch, I rip long pieces of white muslin fabric and wrap my monkey in it. I tack it along the way with thread. I use tea dye to get the "aged" effect along with some Prismacolor woodless pencils. If I get a chance to make another one, I will make a tutorial of the whole process.

Enjoy your little mummy monkeys and if you use this pattern, please remember to give me credit!


Please respect Lisa's TERMS OF USE:  My FREE tutorials, patterns, and how-to's are for personal use only and are not not intended for commercial use. They may not be copied, reprinted, emailed, or reproduced and distributed in any manner without my permission.

Lisa's Bio: Lisa is a professional teddy bear artist selling heirloom quality collectible bears to Adults and has been making bears professionally since November 1997. Her creations have been nominated for several Awards including the TITA, Teddy Bear Scene Reader's Choice Awards and the Ace Awards. They've also been included on a regular basis in many of the major doll and crafts magazines.

Copyright © 2007-2012 - All Rights Reserved - Lisa Bunting Thoms of Q.D. Patooties at http://qdpatooties.blogspot.com.

Please visit Lisa's Q.D. Patooties Spoonflower Fabric Shop and her Q.D. Patooties Etsy Shop.

الجمعة، 6 أبريل 2012

Pretty Little Monsters Free Pattern From Lisa Bunting Thoms of Q.D. Patooties

I just LOVE softies - especially the ones that Lisa Bunting Thoms designs for  Q.D. Patooties. In fact, I like to say I'm her biggest fan.  Of course, Lisa has many, many fans.  Meet "Pretty Little Monsters!"  They're too adorable to resist.


Pretty Little Monsters

Copyright © 2010 - Written By Lisa Bunting Thoms of Q.D. Patooties


Click on picture above to enlarge.

Here's the instructions and what Lisa said about her pattern:  I was going to put this up last night but my scanner was acting up. So I finally finished my monsters and have drawn up the pattern so you guys can make your own! I was going to upload it last night but my darn scanner would not cooperate.  So here it is in all it's Monster-y glory.

All you need to do is to click on the pattern. After you click, the pattern will enlarge. Then, just right click and "Save Image As" to save it to your computer. Then print it out.  All of the instructions are printed directly on the pattern.

There are instructions on the pattern but I'll go over them for you here as well.  Please note there is a 1/8" seam allowance built into this pattern.  Trace the pattern onto the wrong side of your fabric.  Working with the two back pieces, place right sides together.  Sew from Point a to Point B and from Point C to Point D making sure to leave your opening for stuffing.  Open your fabric and then pin the front side of of the monster to the back side with right sides together.  Sew, turn, fray chek and clip cures.  Stuff and sew up the back of your monster using a ladder stitch.  When you give him a face, you have a choice.  You can either make a "cheering monster" or a "jeering monster." The "cheering monster" will have his hands up in the air and be happy and the "jeering monster" will have his hands down by his side and be all sad.  So with one pattern you get a twofer -- two monsters in one!

After you make your monster, I'd love to see them. If you're on Flickr, it's really easy by joining the q.D.PaToOtieS group there.  I will start picking some of the photos I find on there to share on my Blog. 

Please respect Lisa's TERMS OF USE:  My FREE tutorials, patterns, and how-to's are for personal use only and are not not intended for commercial use. They may not be copied, reprinted, emailed, or reproduced and distributed in any manner without my permission.

Lisa's Bio: Lisa is a professional teddy bear artist selling heirloom quality collectible bears to Adults and has been making bears professionally since November 1997. Her creations have been nominated for several Awards including the TITA, Teddy Bear Scene Reader's Choice Awards and the Ace Awards. They've also been included on a regular basis in many of the major doll and crafts magazines.

Copyright © 2007-2012 - All Rights Reserved - Lisa Bunting Thoms of Q.D. Patooties at http://qdpatooties.blogspot.com.

Please visit Lisa's Q.D. Patooties Spoonflower Fabric Shop and her Q.D. Patooties Etsy Shop.

السبت، 14 يناير 2012

A Gnarly Tree Free Tutorial by Romona King of Northbrook Designs

I thought you might all like to know that Romona King of Northbrook Designs has created another wonderful FREE .pdf tutorial on her Northbrook Designs blog showing you how to create a gnarly tree.


A Gnarly Tree
© 2011 by Romona King of Northbrook Designs

If you'd like to download Romona's tutorial please click on the picture above or CLICK HERE TO DOWNLOAD


Here's what Romona had to say about her tutorial:

This tutorial came about unexpectedly. In a last minute decision to make some Halloween ornaments I realized I didn't have any kind of a display to hang them on. I have a glittery tree and I have a dress form prop, but not very Halloween oriented at all. So a tree was created out of necessity. The supply list is short and the steps are so easy, they just require you to not take this or any of the tutorials I write, very seriously. Play with the ideas and just let your own creativity show through, all I ask is that you let anyone who asks, know where they can find this tutorial so that at the very least you give me credit for implanting some ideas. So let’s get started.

Please respect Romona's Terms of Use - Feel free to share this tutorial, but please remember to give me credit for the information contained here.

Copyright © 2011 - All Rights Reserved — Written By Romona King of Northbrook Designs. Romona is a crafter, doll maker, painter, needlework artist, and mixed media artist. You can visit her Northbrook Designs blog online at http://northbrookdesigns.blogspot.com/. You can also visit her Northbrook Designs shop at http://www.northbrookdesigns.com/.

السبت، 24 سبتمبر 2011

It's Getting Spooky In Here - Halloween Crafts Projects From The Best Free Craft Articles Contributors

Ghosts, goblins, and witches - oh, my!

Dracula's, mummies, and Frankensteins, too!

Watch out  - they might just get you!

If you LOVE Halloween fun like I do and love to decorate for Halloween then you'll love all the wonderful free Halloween articles, e-patterns, tutorials, graphics, stitcheries, craft projects and more from The Best Free Craft Articles blog contributors. Here they all are:


Please respect each artist or crafters Terms Of Use for their free article.

I hope you were inspired to create some monsters of your very own!

Ghosts, goblins, and witches - oh, my!

الخميس، 21 أكتوبر 2010

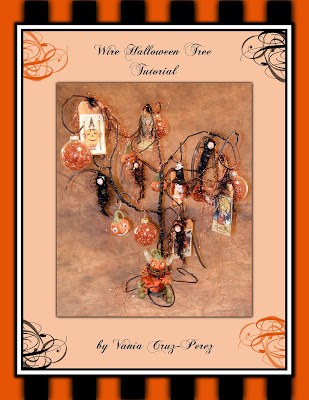
Halloween Wire Tree Free Tutorial By Vania Cruz-Perez of Fantasy Whispers

If you love Halloween and spooky creations like I do then you'll be happy to know that Vania Cruz-Perez has a wonderful tutorial on her Fantasy Whispers - The Art Of Vania Cruz-Perez website and  Fantasy Whispers - The Art Of Vania Cruz-Perez Blog showing you how to make a Halloween wire tree.  What a wonderful way to hang all your spooky creations. 


Copyright © 2010 - All Rights Reserved - Written By Vania Cruz-Perez of Fantasy Whispers.

Here's what Vania had to say about her tutorial:   Once again I'm offering a FREE tutorial. Last year this tutorial was a success with so many people wanting to give it a try. It's a tutorial on how to make your own Halloween Wire Tree. This year I will provide you with a direct link to the tutorial housed on my website.

Please respect Vania's TERMS OF USE:  If you use my tutorial please provide a link back to my Fantasy Whispers - The Art Of Vania Cruz-Perez Blog @ http://www.fantasywhispersblog-ooak.blogspot.com/ as a courtesy.

Copyright © 2010 - All Rights Reserved - Vania Cruz-Perez of Fantasy Whispers - The Art Of Vania Cruz-Perez. Vania is a professional art doll sculptor.

Please visit her Fantasy Whispers - The Art Of Vania Cruz-Perez website @ http://www.fantasywhispers.com/,  her Fantasy Whispers - The Art Of Vania Cruz-Perez Blog @ http://www.fantasywhispersblog-ooak.blogspot.com/, and her Fantasywhispers Etsy Shop at http://fantasywhispers.etsy.com/.