‏إظهار الرسائل ذات التسميات monsters. إظهار كافة الرسائل

الأربعاء، 4 يوليو 2012

Little Monsters Free Tutorial by Alisa Burke

Decorating for Halloween is so much fun.  Especially when Alisa Burke shows you how to decorate with adorable little monsters.  Have fun decorating!

little monsters tutorial
Copyright © 2010 - All Rights Reserved - Written by Alisa Burke of Alisa Burke

Here's what Alisa had to say about her tutorial: With Halloween right around the corner, I was inspired to create a handful of colorful little monsters from recycled cardboard tubes. If you weren't aware, I love finding new ways to upcycle cardboard tubes- they are free and super easy to turn into something unique. This project would be really fun for kids or for those who are like me and sometimes act like a kid!

Please respect Alisa's TERMS OF USE:  I work really hard to come up with my art, tutorials, ideas, classes, inspiration and more. Please understand that everything I post on my blog is for your personal use only - not for resale or redistribution. Please contact me if you are interested in using anything that I share online-thank you!!!

For more information on Alisa's Terms of Use please CLICK HERE.

Alisa's Bio: Alisa Burke is a freelance painter and mixed media artist who studied fine art at Portland State University. With a background in painting and printmaking, a desire to explore and push materials, Alisa is always looking for new ways to break the rules and redefine art. She draws inspiration from street art, graffiti, art history and fashion and it is not uncommon to find her digging through the trash in hopes of recycling something unique use in her artwork.

Alisa’s paintings have been exhibited in a variety of galleries and her handmade, painted accessories are carried in a number of boutiques across the country. Her artwork has been featured in publications such as Cloth Paper Scissors, Quilting Arts, Where Women Create, Somerset Studios’ Haute Handbags, Art Doll Quarterly, and the University of San Diego Magazine. In addition to making art, Alisa teaches a variety of workshops nation wide. Alisa appeared as a guest artist on the DIY Network show Craft Lab and book Canvas Remix was released in spring 2008.

Copyright © 2010 - All Rights Reserved - Alisa Burke of Alisa Burke.

Please visit her Alisa Burke website at http://www.alisaburke.com and her Alisa Burke - Redefine Creativity blog at http://www.alisaburke.blogspot.com. Her Alisa Burke Etsy shop is at http://alisaburke.etsy.com.

الثلاثاء، 8 مايو 2012

Upcycled Baby Clothing Creature by Alisa Burke of Alisa Burke

I just LOVE softies especially ones that can evoke sentimental memories. If you love to recycle and love creating sentimental memories from your children's clothing then you'll love Alisa Burke's Upcycled Baby Clothing Creatures tutorial. Turn your kids clothing into sentimental softies. What a great idea!

Copyright © 2012 - All Rights Reserved - Written by Alisa Burke of Alisa Burke

Here's what Alisa had to say about her tutorial: Our baby is growing like a weed and that means lots of clothing doesn't fit anymore! And while we haven't invested very much money in her wardrobe (thank goodness!), we still have some cute things that already hold lots of memories and I can't bear to get rid of. So I have been saving my favorite outfits to cut up and create a whole bunch of abstract and whimsical little creatures to keep in Lucy's room for future play time and to display as little mementos of her early years. As she continues to grow out of more clothing, I will keep adding more creature to the collection!

Please respect Alisa's TERMS OF USE:  I work really hard to come up with my art, tutorials, ideas, classes, inspiration and more. Please understand that everything I post on my blog is for your personal use only - not for resale or redistribution. Please contact me if you are interested in using anything that I share online-thank you!!!

For more information on Alisa's Terms of Use please CLICK HERE.

Alisa's Bio: Alisa Burke is a freelance painter and mixed media artist who studied fine art at Portland State University. With a background in painting and printmaking, a desire to explore and push materials, Alisa is always looking for new ways to break the rules and redefine art. She draws inspiration from street art, graffiti, art history and fashion and it is not uncommon to find her digging through the trash in hopes of recycling something unique use in her artwork.

Alisa’s paintings have been exhibited in a variety of galleries and her handmade, painted accessories are carried in a number of boutiques across the country. Her artwork has been featured in publications such as Cloth Paper Scissors, Quilting Arts, Where Women Create, Somerset Studios’ Haute Handbags, Art Doll Quarterly, and the University of San Diego Magazine. In addition to making art, Alisa teaches a variety of workshops nation wide. Alisa appeared as a guest artist on the DIY Network show Craft Lab and book Canvas Remix was released in spring 2008.

Copyright © 2012 - All Rights Reserved - Alisa Burke of Alisa Burke.

Please visit her Alisa Burke website at http://www.alisaburke.com and her Alisa Burke - Redefine Creativity blog at http://www.alisaburke.blogspot.com. Her Alisa Burke Etsy shop is at http://alisaburke.etsy.com.

الاثنين، 9 أبريل 2012

Free Pattern for Count Truffula, Vampire Piggy! From Lisa Bunting Thoms of Q.D. Patooties

I just LOVE softies - especially the ones that Lisa Bunting Thoms designs for  Q.D. Patooties and she has a wonderful Dracula pattern to share.  Here's Count Truffula!

Count Truffula, Vampire Piggy!
Copyright © 2010 - All Rights Reserved - Lisa Bunting Thoms of  Q.D. Patooties

Here's the instructions and what Lisa had to say about her pattern:  Sorry it took me so long to upload this but when I went to open my software last night that I usually use to clean up my patterns, it said the link wouldn't work so I guess I will have to find my discs and re-install it. In the meantime, I am hoping you all can read my chicken scratch handwriting on the pattern pieces to make out what goes where!

Click on picture to enlarge.
Materials:

1/4 yard Felt or Other Material for Pig Body 
Scrap Felt for Ear Lining, Mouth Lining, Eyes and Teeth
1/8 Yard Felt for Cape
Embroidery Floss
Yarn or Ribbon for Cape
Sewing Machine (a little too much to do by hand)
Poly Fil
Embroidery Floss
Needle 
Thread
Craft Glue
Pipe Cleaner

Instructions:

1.) Copy and save pattern to your hard drive by double clicking on the pattern image. Right click on the pattern and then choose "Save Image As" and name the file.

2.) Print your pattern and cut out all pattern pieces. Trace pattern pieces according to the number required for each pattern piece onto your fabric.

3). Starting with the ears, line up the bottoms of both the inner and outer ear pieces and then topstitch the inner ear piece to the outer ear piece. You may tack them in place by pinning, basting or using some craft glue if you feel uncomfortable just sewing them without them being securely in place. Repeat for the second ear and then set aside.

4). Next, line up the notch on the fangs pattern piece with the notch on the mouth pattern piece. Topstitch the fangs to the mouth piece (as with the pieces above you can secure them the same way if you like before you topstitch) and then position it underneath the cut open mouth on the front pattern piece of your piggy vampire. Pin in place and then sew by machine or by hand if you choose.

5). Find the nose pattern piece and position it about an inch above the open mouth on the front piece of the pig pattern. Make sure it is centered and then stitch in place by hand or machine.

6). Position each eye between the mouth and nose and about an inch and a half from the side on the front piece of the pig pattern. Secure them prior to sewing with by basting or with a little craft glue just to make sure they are even before you sew them into place permanently. Sew them in place by machine or by hand.

7). Set the front piece of the pig pattern aside and sew all of your arms and legs making sure to leave them open at the top for a little stuffing. I did not turn mine but just clipped them close to the seam, filled with a little Polyfil and then pinned them to the right side of the front piece of your pig pattern making sure the open pieces of each part were pinned to the edge of the pig pattern and all of the closed ends of the arms and legs pointed in towards the mouth. Pin on the ears the same way. Set this aside while you complete the back of your pig.

8). Sew the back piece of your pig pattern from Point A to Point B and then from Point C to Point D leaving an opening to stuff your pig. Set this aside and work on your pig's tail.

9). Sew your pig's tail together. I didn't turn this either just clipped close to the edges and then inserted a small piece of pipe cleaner (bent in half) to make it curly. Set your pig's tail aside.

10). Pin the right sides of both the front and back pieces of your Pig Pattern together and then sew around the outside. Now you can turn your pig and clip as close to the seam as you can. Stuff your pig with Polyfil and you are ready to sew up his back seam. He's transforming before your very eyes!

11). Grab your pig tail pattern piece and pin at the very bottom of the open seam on your pig's back. Ladder stitch it in place as you are sewing up the back of your pig. Your getting close now -- he's almost done!

12). Lay a small piece of felt down underneath your completed pig. Cut out a rectangle the length of your pig and 1 1/2 times the width of your pig. Using a large eyed needle, thread it with yarn or ribbon and do a running stitch about 3 inches down from the top. Leave a long tail on each end so you can secure it around your vampire piggy's neck.

13). Count Truffula is now complete and is ready to start sucking the life out of all of your chocolates! I would hide them now if I were you.

Now that you've completed your Count Truffula, Vampire Piggy, snap a photo and send it to me or just drop it in the q.D.paToOtieS Flickr Group. I'll show off your creation and send a link back to you at your Blog or on Flickr. 

As with any of my patterns, this is not intended for commercial use but just for the fun of making for yourself or your friends.

Enjoy!


Please respect Lisa's TERMS OF USE:  My FREE tutorials, patterns, and how-to's are for personal use only and are not not intended for commercial use. They may not be copied, reprinted, emailed, or reproduced and distributed in any manner without my permission.

Lisa's Bio: Lisa is a professional teddy bear artist selling heirloom quality collectible bears to Adults and has been making bears professionally since November 1997. Her creations have been nominated for several Awards including the TITA, Teddy Bear Scene Reader's Choice Awards and the Ace Awards. They've also been included on a regular basis in many of the major doll and crafts magazines.

Copyright © 2007-2012 - All Rights Reserved - Lisa Bunting Thoms of Q.D. Patooties at http://qdpatooties.blogspot.com


Please visit Lisa's Q.D. Patooties Spoonflower Fabric Shop and her Q.D. Patooties Etsy Shop.

الجمعة، 6 أبريل 2012

Pretty Little Monsters Free Pattern From Lisa Bunting Thoms of Q.D. Patooties

I just LOVE softies - especially the ones that Lisa Bunting Thoms designs for  Q.D. Patooties. In fact, I like to say I'm her biggest fan.  Of course, Lisa has many, many fans.  Meet "Pretty Little Monsters!"  They're too adorable to resist.


Pretty Little Monsters

Copyright © 2010 - Written By Lisa Bunting Thoms of Q.D. Patooties


Click on picture above to enlarge.

Here's the instructions and what Lisa said about her pattern:  I was going to put this up last night but my scanner was acting up. So I finally finished my monsters and have drawn up the pattern so you guys can make your own! I was going to upload it last night but my darn scanner would not cooperate.  So here it is in all it's Monster-y glory.

All you need to do is to click on the pattern. After you click, the pattern will enlarge. Then, just right click and "Save Image As" to save it to your computer. Then print it out.  All of the instructions are printed directly on the pattern.

There are instructions on the pattern but I'll go over them for you here as well.  Please note there is a 1/8" seam allowance built into this pattern.  Trace the pattern onto the wrong side of your fabric.  Working with the two back pieces, place right sides together.  Sew from Point a to Point B and from Point C to Point D making sure to leave your opening for stuffing.  Open your fabric and then pin the front side of of the monster to the back side with right sides together.  Sew, turn, fray chek and clip cures.  Stuff and sew up the back of your monster using a ladder stitch.  When you give him a face, you have a choice.  You can either make a "cheering monster" or a "jeering monster." The "cheering monster" will have his hands up in the air and be happy and the "jeering monster" will have his hands down by his side and be all sad.  So with one pattern you get a twofer -- two monsters in one!

After you make your monster, I'd love to see them. If you're on Flickr, it's really easy by joining the q.D.PaToOtieS group there.  I will start picking some of the photos I find on there to share on my Blog. 

Please respect Lisa's TERMS OF USE:  My FREE tutorials, patterns, and how-to's are for personal use only and are not not intended for commercial use. They may not be copied, reprinted, emailed, or reproduced and distributed in any manner without my permission.

Lisa's Bio: Lisa is a professional teddy bear artist selling heirloom quality collectible bears to Adults and has been making bears professionally since November 1997. Her creations have been nominated for several Awards including the TITA, Teddy Bear Scene Reader's Choice Awards and the Ace Awards. They've also been included on a regular basis in many of the major doll and crafts magazines.

Copyright © 2007-2012 - All Rights Reserved - Lisa Bunting Thoms of Q.D. Patooties at http://qdpatooties.blogspot.com.

Please visit Lisa's Q.D. Patooties Spoonflower Fabric Shop and her Q.D. Patooties Etsy Shop.

السبت، 24 سبتمبر 2011

It's Getting Spooky In Here - Halloween Crafts Projects From The Best Free Craft Articles Contributors

Ghosts, goblins, and witches - oh, my!

Dracula's, mummies, and Frankensteins, too!

Watch out  - they might just get you!

If you LOVE Halloween fun like I do and love to decorate for Halloween then you'll love all the wonderful free Halloween articles, e-patterns, tutorials, graphics, stitcheries, craft projects and more from The Best Free Craft Articles blog contributors. Here they all are:


Please respect each artist or crafters Terms Of Use for their free article.

I hope you were inspired to create some monsters of your very own!

Ghosts, goblins, and witches - oh, my!

الخميس، 21 أكتوبر 2010

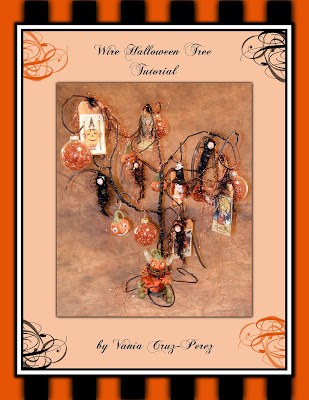
Halloween Wire Tree Free Tutorial By Vania Cruz-Perez of Fantasy Whispers

If you love Halloween and spooky creations like I do then you'll be happy to know that Vania Cruz-Perez has a wonderful tutorial on her Fantasy Whispers - The Art Of Vania Cruz-Perez website and  Fantasy Whispers - The Art Of Vania Cruz-Perez Blog showing you how to make a Halloween wire tree.  What a wonderful way to hang all your spooky creations. 


Copyright © 2010 - All Rights Reserved - Written By Vania Cruz-Perez of Fantasy Whispers.

Here's what Vania had to say about her tutorial:   Once again I'm offering a FREE tutorial. Last year this tutorial was a success with so many people wanting to give it a try. It's a tutorial on how to make your own Halloween Wire Tree. This year I will provide you with a direct link to the tutorial housed on my website.

Please respect Vania's TERMS OF USE:  If you use my tutorial please provide a link back to my Fantasy Whispers - The Art Of Vania Cruz-Perez Blog @ http://www.fantasywhispersblog-ooak.blogspot.com/ as a courtesy.

Copyright © 2010 - All Rights Reserved - Vania Cruz-Perez of Fantasy Whispers - The Art Of Vania Cruz-Perez. Vania is a professional art doll sculptor.

Please visit her Fantasy Whispers - The Art Of Vania Cruz-Perez website @ http://www.fantasywhispers.com/,  her Fantasy Whispers - The Art Of Vania Cruz-Perez Blog @ http://www.fantasywhispersblog-ooak.blogspot.com/, and her Fantasywhispers Etsy Shop at http://fantasywhispers.etsy.com/.