‏إظهار الرسائل ذات التسميات wool felt. إظهار كافة الرسائل

السبت، 24 نوفمبر 2012

The Elves Christmas Garland - Christmas Tutorial No. 11 by Ros Coffey

What could be cheerier than a mittens, stockings, and scarves garland made of felt? Not much. If you agree then you'll be pleased to know that Ros Coffey has a tutorial on her RosMadeMe Blog blog showing you how to make this adorable garland.   I just love it.

The Elves Christmas Garland - Christmas Tutorial no. 11

Copyright © 2011 - All Rights Reserved - Written by Ros Coffey of RosMadeMe Blog.

Here's what Ros had to say about her tutorial:  I like working with felt, it is so forgiving and it is brilliant at making winter outfits for elves. Now as you all know, no self respecting helper of Santa Claus would dream of turning up for work without his mittens, socks and matching scarf... so in case of any elf being caught short you will now have a spare wardrobe hanging over your fireplace.

Ros's Bio:I live by the sea, in Essex, in Leigh-on-sea. I have been making things since I was a child, earliest memories were embroidering squares of binca matting, making felt egg cups and ripping back my knitting when my sister had picked up a dropped stitch... yep, it really did have to be all my own work! I am a dreadful hoarder, with stashes of wool and fabric hidden around my house, together with the projects that I have not yet finished. I am currently making cushions, quilted, appliqued, stencilled... actually just anything that I will enjoy crafting.

Copyright © 2010 - 2012 - All Rights Reserved - Ros Coffey of RosMadeMe Blog .

Please visit her RosMadeMe blog at http://rosmademe.blogspot.com .

الأحد، 11 نوفمبر 2012

A Wool Crazy Christmas Pincushion Pattern By Kaaren Johnston of The Painted Quilt

By now you know for sure that I just LOVE pincushions. Therefore, you have to know that there was no way I was going to avoid adding  Kaaren Johnston's adorable "A Wool Crazy Christmas" pincushion to my "to do" list.  In fact, I'm going to add it to the top of my rather lengthy "to do" list.  Kaaren shared her wonderful pattern on her The Painted Quilt blog.  I hope you enjoy making yours.  I know I'm going to LOVE mine.

First Friday Freebie #15 - A Wool Crazy Christmas

Copyright © 2010 - All Rights Reserved - Kaaren Johnston of The Painted Quilt

Here's what Kaaren had to say about her pattern:  It’s the First Friday of the month again. Where is the time going?

I took a much needed break yesterday from the packing, purging and sorting to rest and regroup. I can’t wait until the move is over and and we’re settled in our new home.

Thank goodness I was able to remain a project ahead with my FFF’s and this month’s design was completed just after we purchased our new/old home at the end of September. I knew I just wouldn’t have the time to work on the design once the packing began.

I designed this month’s FFF in anticipation of the upcoming holiday season. I hope you enjoy making A Wool Crazy Christmas as much as I did.


Please respect Kaaren's TERMS OF USE:  The use of my pattern/design and tutorials is limited to individual and personal use only. Distributing or selling my pattern or tutorials in any form is not permitted. They may not be used for commercial purposes unless written permission is granted. Credit for my pattern and tutorials should be included if displayed in any manner. Individual users may enlarge or reduce the size of the drawings for their personal use but may not alter them in any other way.

Kaaren's Bio: I am an artist and have recently retired from actively designing, publishing and travel teaching in the decorative painting industry. A short while later, in December of 2010, we moved from Eastern Ontario to the beautiful Annapolis Valley of Nova Scotia. Quilting, stitching, applique and most recently rug hooking have become my new passions. Oh, and did I mention that I love to make and collect pincushions and needlecases! Join me on the First Friday of every month when I release a new Freebie design for you to make and enjoy.


Copyright © 2009 - 2012 - All Rights Reserved - Kaaren Johnston of The Painted Quilt.

Please visit her The Painted Quilt blog at  http://thepaintedquilt.blogspot.com/ and her The Painted Quilt Etsy shop at http://www.etsy.com/shop/kaarenjohnston.


الثلاثاء، 6 نوفمبر 2012

Poinsettia Brooch Tutorial By Lisa Jordan of Lil Fish Studios

I just LOVE wool felt creations - especially if they combine my love of flowers with Christmas. So, I was especially pleased to see that Lisa Jordan had a tutorial on her Lil Fish Studios blog showing you how to make a poinsettia brooch. I'll be making a few of these as gifts this holiday season. Will you?

Poinsettia Brooch Tutorial

Copyright © 2010 - All Rights Reserved - Written by Lisa Jordan of  Lil Fish Studios.

Here's what Lisa had to say about her tutorial:  Feeling festive? How about making a pretty poinsettia for your lapel?

A blog reader asked for a tutorial for these and I thought maybe some others would enjoy making them too. They're a really simple design that anyone can do so grab some felt and get a'making.


Please respect Lisa's TERMS OF USE:  When sharing my tutorials, photos, or content, please link back to my Lil Fish Studios blog @ http://lilfishstudios.blogspot.com/ and give proper attribution. It's just the right thing to do.

Lisa's Bio:Living under the poplar and pine in rural Minnesota I find inspiration in the nature that surrounds me. I'm especially drawn to mushrooms, moss, and the oddly lumpy and beautifully textural bits found on the forest floor.

I'm especially enthralled with wool and wood. Sustainability is important to me and is reflected in the materials and processes I use.

Copyright © 2006 - 2012 - All Rights Reserved - Lisa Jordan of  Lil Fish Studios.

Please visit her  Lil Fish Studios blog at  http://lilfishstudios.blogspot.com/, her Lil Fish Studios Big Cartel shop at http://lilfishstudios.bigcartel.com/, and her Lil Fish Studios Facebook page at https://www.facebook.com/lilfishstudios .

الأربعاء، 17 أكتوبر 2012

How To Cheer Up An Old Bag (No Not Me) with a Handbag Charm Tutorial By Ros Coffey of RosMadeMe Blog

Do you ever get tired of staring at a boring black purse and want to add just a little splash of color?  If you have then you'll be happy to know that Ros Coffey has a tutorial on her RosMadeMe Blog blog showing you how to make a colorful handbag charm.   One for every purse I say.

How To Cheer Up An Old Bag (No Not Me) with a Handbag Charm

Copyright © 2012 - All Rights Reserved - Written by Ros Coffey of RosMadeMe Blog.

Here's what Ros had to say about her tutorial:  After I made the bias binding last week, I had about 18 - 20" of piped cord left over... not enough to pipe around a cushion... but too much just to bin, so what to do with it? I sat there twiddling it and started to make a flower shape, but really did I need another flower brooch... err no! And then it came to me, a handbag charm and for this you will need:

Ros's Bio:I live by the sea, in Essex, in Leigh-on-sea. I have been making things since I was a child, earliest memories were embroidering squares of binca matting, making felt egg cups and ripping back my knitting when my sister had picked up a dropped stitch... yep, it really did have to be all my own work! I am a dreadful hoarder, with stashes of wool and fabric hidden around my house, together with the projects that I have not yet finished. I am currently making cushions, quilted, appliqued, stencilled... actually just anything that I will enjoy crafting.

Copyright © 2010 - 2012 - All Rights Reserved - Ros Coffey of RosMadeMe Blog .

Please visit her RosMadeMe blog at http://rosmademe.blogspot.com .


الأربعاء، 22 أغسطس 2012

Sewing Box Free Tutorial By Kaaren Johnston of The Painted Quilt

Who can resist sewing boxes - especially if they're appliqued?  I know I can't.  If that's the case for you then you'll be happy to know that Kaaren Johnston has a wonderful tutorial on her The Painted Quilt blog showing you how to make an adorable sewing box.  I'll be making one.  How about you?


Copyright © 2009 - All Rights Reserved - Kaaren Johnston of The Painted Quilt

Here's what Kaaren had to say about her tutorial: Last Friday morning when my friend Lucie and I were solving the problems of the world over a cup of tea, she brought out a papier mache box and asked me if I could find a use for it. Immediately, I had a vision and when I got home, I sketched out a pattern and got to work.

Please respect Kaaren's TERMS OF USE:  The use of my pattern/design and tutorials is limited to individual and personal use only. Distributing or selling my pattern or tutorials in any form is not permitted. They may not be used for commercial purposes unless written permission is granted. Credit for my pattern and tutorials should be included if displayed in any manner. Individual users may enlarge or reduce the size of the drawings for their personal use but may not alter them in any other way.

Kaaren's Bio: I am an artist and have recently retired from actively designing, publishing and travel teaching in the decorative painting industry. A short while later, in December of 2010, we moved from Eastern Ontario to the beautiful Annapolis Valley of Nova Scotia. Quilting, stitching, applique and most recently rug hooking have become my new passions. Oh, and did I mention that I love to make and collect pincushions and needlecases! Join me on the First Friday of every month when I release a new Freebie design for you to make and enjoy.


Copyright © 2009 - 2012 - All Rights Reserved - Kaaren Johnston of The Painted Quilt.

Please visit her The Painted Quilt blog at  http://thepaintedquilt.blogspot.com/ and her The Painted Quilt Etsy shop at http://www.etsy.com/shop/kaarenjohnston.


الاثنين، 13 أغسطس 2012

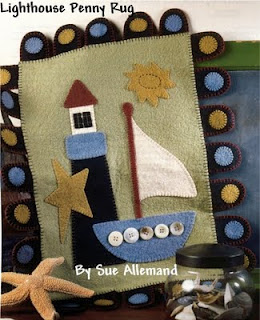
Lighthouse Penny Rug Free E-Pattern By Sue Allemand of Palette Primitives


I just LOVE everything and anything created with wool felt.  Especially if it's a penny rug.  So, I was thrilled to see that Sue Allemand had a terrific e-pattern on her Free Stitchin' Patterns blog for making the cutest lighthouse penny rug.  Enjoy!

Please Note: Unfortunately Sue's free e-pattern is no longer available.


Copyright © 2011 - All Rights Reserved - Sue Allemand of Palette Primitives.

Here's what Sue had to say about her pattern: NEW Free Pattern!  Lighthouse Penny Rug.  Fun and summery - this is a great pattern for hanging on the wall or as a mat on the table!  You'll learn everything you need to know about making penny rugs in this quick and easy pattern by Sue Allemand! e credit to the me whenever possible. Thank you!

Copyright © 1999-2012- All Rights Reserved - Sue Allemand of Palette Primitives. Sue is a professional artist and designer.

Please visit Sue's Palette Primitives website at http://paletteprimitives.com, her Palette Primitives "Get Your Prim On" blog at http://www.paletteprimitives.blogspot.com, her Free Paintin' Patterns blog at http://freepaintinpatterns.blogspot.com and her Free Stitchin' Patterns blog at http://freestitchinpatterns.blogspot.com.

السبت، 11 أغسطس 2012

Wool Crazy Pincushion Free Tutorial By Kaaren Johnston of The Painted Quilt

I just love working with wool or wool felt.  And, I also LOVE pincushions. If you do, too then you'll be happy to know that Kaaren Johnston has a wonderful tutorial on her The Painted Quilt blog showing you how to make a wool crazy pincushion.  I just LOVE it.


Copyright © 2010 - All Rights Reserved - Kaaren Johnston of The Painted Quilt

Here's what Kaaren had to say about her tutorial: At the outset, let me say that all the wool that I used came from scraps that I have saved over the years. Whenever I work with wool, I save all the bits and pieces and store them by color in separate zip lock bags. When I’m working on a project that requires small pieces of wool in a specific color, I just reach into the plastic bin that holds all my baggies of scrap wool and pull out the appropriate bag.

If for whatever reason you don’t have any wool or you might be allergic to wool (perish the thought), you can also make this pincushion in the exact same way that I am about to show you using fabric. The instructions are identical.


Please respect Kaaren's TERMS OF USE:  The use of my pattern/design and tutorials is limited to individual and personal use only. Distributing or selling my pattern or tutorials in any form is not permitted. They may not be used for commercial purposes unless written permission is granted. Credit for my pattern and tutorials should be included if displayed in any manner. Individual users may enlarge or reduce the size of the drawings for their personal use but may not alter them in any other way.

Kaaren's Bio: I am an artist and have recently retired from actively designing, publishing and travel teaching in the decorative painting industry. A short while later, in December of 2010, we moved from Eastern Ontario to the beautiful Annapolis Valley of Nova Scotia. Quilting, stitching, applique and most recently rug hooking have become my new passions. Oh, and did I mention that I love to make and collect pincushions and needlecases! Join me on the First Friday of every month when I release a new Freebie design for you to make and enjoy.


Copyright © 2009 - 2012 - All Rights Reserved - Kaaren Johnston of The Painted Quilt.

Please visit her The Painted Quilt blog at  http://thepaintedquilt.blogspot.com/ and her The Painted Quilt Etsy shop at http://www.etsy.com/shop/kaarenjohnston.


الأربعاء، 23 مايو 2012

Embellished Socks and Whimsical Felt Slippers Free Tutorials by Alisa Burke

Have you ever wanted to just have a little fun with your clothing or be a little whimsical? I know that I have. Well, Alisa Burke has two adorable tutorials showing you how to embellish your socks and how to make whimsical felt slippers. Have fun!

Copyright © 2011 - All Rights Reserved - Written by Alisa Burke of Alisa Burke

Here's what Alisa had to say about her tutorial: I have a bit of an obsession with boots- short, tall, vintage, black, brown- I just can't seem to get enough of them! And when you have a huge boot collection you gotta have cute socks to wear.


Copyright © 2010 - All Rights Reserved - Written by Alisa Burke of Alisa Burke

Here's what Alisa had to say about her tutorial: Now that fall is here, I wake up every morning with cold toes- yes, even in Southern California. For a while I've been wanting to try making my own slippers with a fun and whimsical twist and my icy toes were the perfect excuse. This project could be altered and adapted in so many different ways and would be a great little handmade gift for the holidays.

Please respect Alisa's TERMS OF USE:  I work really hard to come up with my art, tutorials, ideas, classes, inspiration and more. Please understand that everything I post on my blog is for your personal use only - not for resale or redistribution. Please contact me if you are interested in using anything that I share online-thank you!!!

For more information on Alisa's Terms of Use please CLICK HERE.

Alisa's Bio: Alisa Burke is a freelance painter and mixed media artist who studied fine art at Portland State University. With a background in painting and printmaking, a desire to explore and push materials, Alisa is always looking for new ways to break the rules and redefine art. She draws inspiration from street art, graffiti, art history and fashion and it is not uncommon to find her digging through the trash in hopes of recycling something unique use in her artwork.

Alisa’s paintings have been exhibited in a variety of galleries and her handmade, painted accessories are carried in a number of boutiques across the country. Her artwork has been featured in publications such as Cloth Paper Scissors, Quilting Arts, Where Women Create, Somerset Studios’ Haute Handbags, Art Doll Quarterly, and the University of San Diego Magazine. In addition to making art, Alisa teaches a variety of workshops nation wide. Alisa appeared as a guest artist on the DIY Network show Craft Lab and book Canvas Remix was released in spring 2008.

Copyright © 2010 - All Rights Reserved - Alisa Burke of Alisa Burke.

Please visit her Alisa Burke website at http://www.alisaburke.com and her Alisa Burke - Redefine Creativity blog at http://www.alisaburke.blogspot.com. Her Alisa Burke Etsy shop is at http://alisaburke.etsy.com.


السبت، 5 مايو 2012

Make A Modular Felt Trivet and Modular Felt Coaster Free Tutorials by Jessica Jones of Jessica Jones

Don't you just love colorful and different trivets?  If you do check out the two felt trivet tutorials by Jessica Jones.  Enjoy!
Copyright © 2012- All Rights Reserved - Written By  Jessica Jones of Jessica Jones.

Here's what Jessica had to say about her tutorial: Related to yesterday's coaster project, here's a template for making a larger modular felt trivet. No sewing or gluing required. Connect as many pieces as you like to make bigger projects, too--placemats, a runner, or sew two pieces together for a pillow cover.

Copyright © 2012- All Rights Reserved - Written By  Jessica Jones of Jessica Jones.

Here's what Jessica had to say about her tutorial:  Modular pieces that fit together make me really happy, and on a recent Google hunt, I found felt rugs here and here made with interlocking shapes. Very cool. So I tried a pared-down pattern for coasters because I'm way too impatient to fit 847,236,780 pieces together to make a rug.

Please respect Jessica's TERMS OF USE:  You're welcome to link to my How About Orange blog or use a single image and brief description to link back to any post. Republishing posts in their entirety is prohibited without permission.

Copyright © 2012 - All Rights Reserved - Jessica Jones of Jessica Jones. Jessica is a professional graphic and textile designer.

Please visit her Jessica Jones website @ http://www.jessicajonesdesign.com/ and her How About Orange blog @ http://howaboutorange.blogspot.com/.

الأربعاء، 11 أبريل 2012

Felted Candy Cane Ornament How-To by Lisa Bunting Thoms of Q.D. Patooties

If you like working with wool felt and roving  and love ornaments then you'll be happy to know that Lisa Bunting Thoms of  Q.D. Patooties  has a wonderful wool felt and roving holiday project to share.  I hope you enjoy making her " Felted Candy Cane Ornament."

Felted Candy Cane Ornament
Copyright © 2007 - All Rights Reserved - Lisa Bunting Thoms of Q.D. Patooties

Here's the instructions and what Lisa had to say about her Felted Candy Cane Ornament:
Materials
----------
Wool Roving in Red and White (you can buy this from Marr Haven Wool FarmEbay.com or Etsy.com)
18 Gauge Cloth Covered Floral Wire (really even a Pipe Cleaner would do for this project)
36T Felting Needle (again Marr Haven Wool FarmEbay.com orEtsy.com)
Felting Foam Block
Spray Adhesive
Clear Glitter
Ribbon to Hang it on the Tree

Instructions
-------------
Start by wrapping your white wool roving around your floral wire (see Figure 1). Gently felt the roving as you go along and I say gently because if you hit the wire too hard with your needle you could break the needle. Once you have covered the wire with the white wool roving, you can bend it into the shape of a cane (see Figure 2). Then start wrapping your white cane with the red roving gently felting as you go along as you did with the white roving (see Figure 3). Once you've applied your red wool roving, it will look like a Candy Cane! Finally, you can spray your Candy Cane lightly with some Spray Adhesive and decorate it with a little clear glitter. Add a ribbon and then hang it on the tree or just loop the arch of the cane on the tree to hang it.

These are fun, easy to make and look good enough to eat! Enjoy!


Please respect Lisa's TERMS OF USE:  My FREE tutorials, patterns, and how-to's are for personal use only and are not not intended for commercial use. They may not be copied, reprinted, emailed, or reproduced and distributed in any manner without my permission.

Lisa's Bio: Lisa is a professional teddy bear artist selling heirloom quality collectible bears to Adults and has been making bears professionally since November 1997. Her creations have been nominated for several Awards including the TITA, Teddy Bear Scene Reader's Choice Awards and the Ace Awards. They've also been included on a regular basis in many of the major doll and crafts magazines.

Copyright © 2007-2012 - All Rights Reserved - Lisa Bunting Thoms of Q.D. Patooties at http://qdpatooties.blogspot.com.

Please visit Lisa's Q.D. Patooties Spoonflower Fabric Shop and her Q.D. Patooties Etsy Shop.

Skinny Snowman Free Project by Lisa Bunting Thoms of Q.D. Patooties

If you like working with wool felt and roving  and like creating snowmen you'll be happy to know that Lisa Bunting Thoms of  Q.D. Patooties  has a wonderful wool felt and roving holiday project to share.  I hope you enjoy making her "Skinny Snowman."


Skinny Snowman Tutorial
Copyright © 2007 - All Rights Reserved - Lisa Bunting Thoms of Q.D. Patooties


Here's the instructions and what Lisa had to say about her Skinny Snowman Tutorial: 

Materials
  • Some Felting Wool in Cream, Black and Orange (you can buy this from Marr Haven Wool Farm, Ebay.com or Etsy.com)
  • 36T Felting Needle (again Marr Haven Wool Farm, Ebay.com or Etsy.com)
  • A Knee High Panty Hose or One Leg of a Pair of Panty Hose
  • A Foam Ball (like the ones you use in the swimming pool)
  • A Discarded Paper Towel Roll
  • Some Cotton Batting or Off White Felt (a fat quarter should do - 18"x22")
  • 18 Gauge Cloth Covered Floral Wire (really even a Pipe Cleaner would do for this project)
  • A Snowman Hat (Knitted or Felt)
  • Extras to Decorate Your Snowman (vintage buttons, pom poms, fancy yarn, wreath to hold, etc.)
  • A Small Amount of Polyfil Stuffing
  • Spray Adhesive
  • Beacon Craft Glue or Glue Gun
  • Needle and Thread
  • Clear Glitter
Directions


The Head. Start by wrapping a foam ball like the one you see in Figure 1with wool roving. After you cover the ball with the first layer, use your felting needle to felt the wool into the foam ball. Continue this process until the ball is almost completely covered like the one you see in Figure 2. Then, take your ball and put it in a nylon knee high. Tie a knot in the knee high as close to the ball as you possibly can. Run your ball under some water in your sink making sure to wet all sides. Squeeze as much water as you can out of the ball. Do this several times and then put your ball in the dryer. I usually put mine in with some jeans so it gets "roughed up" a little more and plus I usually have it on the highest heat when I'm drying jeans. Next, take your ball out of the dryer and it will be felted even more and almost have a smooth appearance. If you wish to add more cream to your head, you can do that now but you will also be adding your face which may cover up those bare spots anyway. Felt on a happy snowman eyes and smile with your black roving as show in Figure 3. Make a carrot nose using your orange roving. You may need to pull out your foam block to do this part of the project. Add some rosy color to your snowman's cheeks if you wish with some Prismacolor Markers or your favorite shading medium.

Click picture above to enlarge.

The Body. Carefully study the snowman in Figure 4 and let him be your guide to completing the body portion of this project. Using your discarded paper towel roll as a guide, cut some cotton batting or wool felt to fit around the tube. Make sure it extends about 1/4 inch at the top and overlaps in the back by about the same. Cover your cotton batting lightly with some spray adhesive and apply it to the paper towel roll. While it is drying, sew up your arms using the pattern provided above. It should print nicely on a normal sheet of paper. After you've sewn your arms, turn them right side out. Take your cotton covered wire, fold it in half and twist the two ends together so it no longer has an end that could poke through your fabric. Then, place it in one of the snowman arms with the twisted portion at the top of the arm. You can stuff your arm a little if you wish but not too much. Tack the top of the arm to the top of the body where the cotton batting extends about 1/4" with some needle and thread. Repeat this process for the other arm. Line the inside top of the paper towel tube with either hot glue or your fabric glue and then fold the 1/4" (with the arms tacked on) over so that it fold inside of the tube and is glued down. Using your hot glue gun or the fabric glue put a rim of glue around the top of the body and then place the head you completed on top.

Finishing Your Snowman. Now comes the fun part - embellishing and finishing your Snowman! Put on his hat, glue some buttons down the front of the body and put a few strands of fancy yarn around his neck for a scarf. Bend his arms and put something in them - like a wreath, small bottle brush tree or even some sheet music so he can go caroling. I used a wreath for my Snowman (see Figure 5.) but when I make some this year, I think I'm going to do sheet music. Have fun and be creative!

On a side note, because the head is so light, your snowman should stand with no problem. Should you want him to be even more stable, you can make a stand out of felt and glue him to it if you prefer. Mine Snowman from last year has been standing for a year in my office with no problems.

Have a Holly Jolly!

Please respect Lisa's TERMS OF USE:  My FREE tutorials, patterns, and how-to's are for personal use only and are not not intended for commercial use. They may not be copied, reprinted, emailed, or reproduced and distributed in any manner without my permission.

Lisa's Bio: Lisa is a professional teddy bear artist selling heirloom quality collectible bears to Adults and has been making bears professionally since November 1997. Her creations have been nominated for several Awards including the TITA, Teddy Bear Scene Reader's Choice Awards and the Ace Awards. They've also been included on a regular basis in many of the major doll and crafts magazines.

Copyright © 2007-2012 - All Rights Reserved - Lisa Bunting Thoms of Q.D. Patooties at http://qdpatooties.blogspot.com.

Please visit Lisa's Q.D. Patooties Spoonflower Fabric Shop and her Q.D. Patooties Etsy Shop.

السبت، 6 نوفمبر 2010

Needlepoint/Sewing Clutch Free Tutorial by Colleen MacKinnon of Rag-a-Muffin Collectibles

As far as I'm concerned you can never have enough clutches for carrying around all your various craft supplies and projects. Well, if you're like me you'll be happy to know that Colleen MacKinnon of Rag-a-Muffin Collectibles has a wonderful tutorial on her Penny Rugs and More blog showing you how to make a needlepoint/sewing clutch.  Enjoy!


Copyright © 2008 - Written By Colleen Mackinnon of Rag-a-Muffin Collectibles.

Here's what Colleen had to say about her tutorial: We escaped to the lake for a couple days and I found some time to stitch! Here's the needlepoint clutch tutorial. I left a few things behind in my studio; but I worked it out for you.

Please respect Colleen's TERMS OF USE:  **All my patterns and tutorials are copyright protected**. Please respect my designs and images, make no copies from my blog or my website without my permission. My tutorials and patterns are not be sold or produced without my permission. Please don’t email or transmit them in any way. You may pass on and save my links. If you make something from my intellectual product and show it on a blog or website, please link back to my posts as your source. Thanks so much. Colleen MacKinnon

Colleen's bio - Having been active in craft shows, events and sales through local craft stores during the 1980’s and 1990’s, organizing and running my own show for several years during the “turn of the century”; I now like to share what I’ve learned. Lately that’s been penny rugs.

I enjoy working with and collecting wool, new, used and vintage. Penny rugs are a great way to recycle and reuse any fabric. I have searched and researched penny rugs for many years and started a blog in 2007. Blogging is my way of sharing what I learn, getting it down in print so that I can pass it on and networking with others.

I have some great tutorials and patterns.

Please enjoy them, learn from them.

Remember, today’s handmade treasures are tomorrow’s treasured keepsakes.

Copyright © 2007-2010 - All Rights Reserved - Colleen Mackinnon of Rag-a-Muffin Collectibles.

Please visit her Rag-a-Muffin Collectibles website @ http://sites.google.com/site/ragamuffincollectibles/, her Ragamuffin2006 Etsy Shoppe @ http://www.etsy.com/shop/ragamuffin2006, and her Penny Rugs and More blog at http://www.pennyrugsandmore.blogspot.com/.

Birthday Crown Free Tutorial and E-Pattern by Jessica Levitt of Juicy Bits

Are you looking for a crown for a little boy or girl's birthday party? If you are then you'll be happy to know that  Jessica Levitt has a wonderful tutorial and e-pattern on her Juicy Bits blog showing you how to make felt crown. Have fun at the birthday party.


Copyright © 2008 - Written By Jessica Levitt of Juicy Bits.

Here's what Jessica had to say about her tutorial and e-pattern:   My little princess is 4 going on 24...No she doesn't wear makeup or get pushed to grow up too fast, but sometimes I can't get over how wise she seems. So when she gets excited about something young, sweet, and wholesome, I'm all for it.

As most of you know, I made a cute wool felt crown for Theo's birthday and Aurora loved it. So, of course, I had to make another more girly version.


Please respect Jessica's TERMS OF USE:  My tutorials and e-patterns are the copyright of Jessica Levitt and are for personal use only.

Copyright © 2008-2010 - All Rights Reserved - Jessica Levitt of Juicy Bits.  Jessica is a mom, sewer, crafter and designer.

Please visit her Juicy Bits blog @ http://www.juicy-bits.typepad.com/.

الجمعة، 5 نوفمبر 2010

Poinsettia Brooch Free Tutorial by Colleen MacKinnon of Rag-A-Muffin Collectibles

I just love poinsettia's and love decorating packages with poinsettia's during the holiday season. There's just something about the bright red colors.  Well, I was happy to find that Colleen MacKinnon of Rag-a-Muffin Collectibles had a wonderful tutorial on her Penny Rugs and More blog showing you how to make a Poinsettia brooch.

I am definitely going to make one, or two, maybe even three.  They're just so bright and cheery. They're going to look lovely on my coats.  Wouldn't you agree?


Copyright © 2009 - Written By Colleen Mackinnon of Rag-a-Muffin Collectibles.

Here's what Colleen had to say about her tutorial: Okay I missed the part when the calendar changed to December! Holy cow am I going to be busy this weekend. Time for thoughts of decorating and getting things ready for the season. Let me gift you with my method of making a poinsettia brooch, which could also be an ornament or a very nice accent on a gift package.

Please respect Colleen's TERMS OF USE:  **All my patterns and tutorials are copyright protected**. Please respect my designs and images, make no copies from my blog or my website without my permission. My tutorials and patterns are not be sold or produced without my permission. Please don’t email or transmit them in any way. You may pass on and save my links. If you make something from my intellectual product and show it on a blog or website, please link back to my posts as your source. Thanks so much. Colleen MacKinnon

Colleen's bio - Having been active in craft shows, events and sales through local craft stores during the 1980’s and 1990’s, organizing and running my own show for several years during the “turn of the century”; I now like to share what I’ve learned. Lately that’s been penny rugs.

I enjoy working with and collecting wool, new, used and vintage. Penny rugs are a great way to recycle and reuse any fabric. I have searched and researched penny rugs for many years and started a blog in 2007. Blogging is my way of sharing what I learn, getting it down in print so that I can pass it on and networking with others.

I have some great tutorials and patterns.

Please enjoy them, learn from them.

Remember, today’s handmade treasures are tomorrow’s treasured keepsakes.

Copyright © 2007-2010 - All Rights Reserved - Colleen Mackinnon of Rag-a-Muffin Collectibles.

Please visit her Rag-a-Muffin Collectibles website @ http://sites.google.com/site/ragamuffincollectibles/, her Ragamuffin2006 Etsy Shoppe @ http://www.etsy.com/shop/ragamuffin2006, and her Penny Rugs and More blog at http://www.pennyrugsandmore.blogspot.com/.

الخميس، 4 نوفمبر 2010

Penny Purse Free Tutorial by Colleen MacKinnon of Rag-a-Muffin Collectibles

Several years ago I fell in love with wool felt and penny rugs and love creating all sorts of items using wool and wool felt.  Well, if you love wool felt and penny rug creations then you'll be happy to know that Colleen MacKinnon of Rag-a-Muffin Collectibles has a wonderful tutorial on her Penny Rugs and More blog showing you how to make a penny purse.  I already have my fabric picked out for mine.  Enjoy!


Copyright © 2008 - Written By Colleen Mackinnon of Rag-a-Muffin Collectibles.

Here's what Colleen had to say about her tutorial: As promised, my penny purse tutorial. It would be my pleasure that you could make these from your wooly scraps, for your friends and family. Please, no mass productions without my approval. And, it would be so kind if you would pass on my blog as the site where you learned to make these adorable little purses. I'd love to see pictures of your completed penny purse. Send me your comments too!

Recycle your reclaimed wool and reclaimed zippers. (This is an excellent project for all that reclaimed wool with difficult to remove interfacing)


Please respect Colleen's TERMS OF USE:  **All my patterns and tutorials are copyright protected**. Please respect my designs and images, make no copies from my blog or my website without my permission. My tutorials and patterns are not be sold or produced without my permission. Please don’t email or transmit them in any way. You may pass on and save my links. If you make something from my intellectual product and show it on a blog or website, please link back to my posts as your source. Thanks so much. Colleen MacKinnon

Colleen's bio - Having been active in craft shows, events and sales through local craft stores during the 1980’s and 1990’s, organizing and running my own show for several years during the “turn of the century”; I now like to share what I’ve learned. Lately that’s been penny rugs.

I enjoy working with and collecting wool, new, used and vintage. Penny rugs are a great way to recycle and reuse any fabric. I have searched and researched penny rugs for many years and started a blog in 2007. Blogging is my way of sharing what I learn, getting it down in print so that I can pass it on and networking with others.

I have some great tutorials and patterns.

Please enjoy them, learn from them.

Remember, today’s handmade treasures are tomorrow’s treasured keepsakes.

Copyright © 2007-2010 - All Rights Reserved - Colleen Mackinnon of Rag-a-Muffin Collectibles.

Please visit her Rag-a-Muffin Collectibles website @ http://sites.google.com/site/ragamuffincollectibles/, her Ragamuffin2006 Etsy Shoppe @ http://www.etsy.com/shop/ragamuffin2006, and her Penny Rugs and More blog at http://www.pennyrugsandmore.blogspot.com/.

الأربعاء، 3 نوفمبر 2010

Cutting Circles, The First Stitch, Threads To Dye For, How-To Stitch A Penny Rug 3-Stack, and The Makings Of A Penny Rug Free Tutorials by Colleen MacKinnon of Rag-A-Muffin Collectibles

Several years ago during a shopping trip to Sturbridge with my Mom I fell in love with wool felt and penny rugs and even wrote a post about it on my Linda's Blog entitled I Just Love This "Pumpkin Patch" Penny Rug.

Well, since then I have been searching all over the internet for penny rug kits, patterns and tutorials.  During my search I found not only an amazing website and blog, but an expert on penny rugs.   She is Colleen MacKinnon of Rag-a-Muffin Collectibles and she is a penny rug expert who has some of the most wonderful tutorials and patterns on her Penny Rugs and More blog. Her blog is all about her traditional penny rugs and contains wonderful posts about her penny rugs and wool felt creations as well as several free tutorials on making penny rugs.

Since I always like to learn from the best and hope you do too I thought I would share some of her wonderful tutorials.  But, before you can create penny rugs you need to learn a few basics and Colleen has some wonderful tutorials to teach you the basics.

Here they are:


Copyright © 2008 - Written By Colleen Mackinnon of Rag-a-Muffin Collectibles.

Here's what Colleen had to say about her tutorial: They're back! I've made some more cutting templates! Check out my etsy shop or, my Paypal Widget Storefront on the side bar of this blog. Here I will teach you how to cut wool pennies for your next penny rug project. Remember, you can use any circular object for a template. i.e., pennies or coins (that's why they are called penny rugs), buttons, bottle caps...anything round and of the desired size.


Copyright © 2009 - Written By Colleen Mackinnon of Rag-a-Muffin Collectibles.

Here's what Colleen had to say about her tutorial: Here's how I do that first stitch. This is a two stack. I'm attaching the backing penny. I always wrap the needle just once. The wrap allows that first stitch to stand at attention. No slanty beginnings here.


Copyright © 2008 - Written By Colleen Mackinnon of Rag-a-Muffin Collectibles.

Here's what Colleen had to say about her tutorial: Threads. What thread to use? What thread is the best? Does it matter? What is the look I want? What colour would be best? All good questions.


Copyright © 2007 - Written By Colleen Mackinnon of Rag-a-Muffin Collectibles.

Here's what Colleen had to say about her tutorial: Order a pre-cut kit, including thread and needles, and make a penny rug; Penny Rug Kits  or order my Epattern from my Etsy shop and learn how to put your stacks together.


Copyright © 2009 - Written By Colleen Mackinnon of Rag-a-Muffin Collectibles.

Here's what Colleen had to say about her tutorial:   First things first,

Gather your wool, cut your scraps into circles. Check my tutorial about how to cut circles for a penny rug. For this rug, 3", 2" and 1" circles. No rules! Make them 3.25 and 2.75 and .75 if you want! What do you have in the wool stash?

Please respect Colleen's TERMS OF USE:  **All my patterns and tutorials are copyright protected**. Please respect my designs and images, make no copies from my blog or my website without my permission. My tutorials and patterns are not be sold or produced without my permission. Please don’t email or transmit them in any way. You may pass on and save my links. If you make something from my intellectual product and show it on a blog or website, please link back to my posts as your source. Thanks so much. Colleen MacKinnon

Colleen's bio - Having been active in craft shows, events and sales through local craft stores during the 1980’s and 1990’s, organizing and running my own show for several years during the “turn of the century”; I now like to share what I’ve learned. Lately that’s been penny rugs.

I enjoy working with and collecting wool, new, used and vintage. Penny rugs are a great way to recycle and reuse any fabric. I have searched and researched penny rugs for many years and started a blog in 2007. Blogging is my way of sharing what I learn, getting it down in print so that I can pass it on and networking with others.

I have some great tutorials and patterns.

Please enjoy them, learn from them.

Remember, today’s handmade treasures are tomorrow’s treasured keepsakes.

Copyright © 2007-2010 - All Rights Reserved - Colleen Mackinnon of Rag-a-Muffin Collectibles.

Please visit her Rag-a-Muffin Collectibles website @ http://sites.google.com/site/ragamuffincollectibles/, her Ragamuffin2006 Etsy Shoppe @ http://www.etsy.com/shop/ragamuffin2006, and her Penny Rugs and More blog at http://www.pennyrugsandmore.blogspot.com/.

Felt Owl Ornaments Free E-Pattern by Jessica Levitt of Juicy Bits

I just love wool felt.  Especially when it's used to make adorable ornaments.  Well, if you like making wool felt ornaments like I do then you'll be happy to know that  Jessica Levitt has an adorable owl e-pattern on her Juicy Bits blog.  They're a hoot!


Copyright © 2009 - Written By Jessica Levitt of Juicy Bits.

Here's what Jessica had to say about her e-pattern:   ...... Anyway, these are the little owl ornaments I made. And it’s a simple tutorial, just for you!

Please respect Jessica's TERMS OF USE:  My tutorials and e-patterns are the copyright of Jessica Levitt and are for personal use only.

Copyright © 2009-2010 - All Rights Reserved - Jessica Levitt of Juicy Bits.  Jessica is a mom, sewer, crafter and designer.

Please visit her Juicy Bits blog @ http://www.juicy-bits.typepad.com/.